Purchase Orders provide accounts with a process for submitting and approving their non-recurring spending. Items on Purchase Orders can be tracked internally or billed back to customers at a markup. Accounts that use Purchase Orders track committed costs in their Job Performance report.
What is a Non-Recurring Billable Item?
Before the costs on a Purchase Order can be billed back, the items (materials, rentals, etc.) on the order must be converted to a Non-Recurring Billable (NRB) item. NRBs are Aimsio’s proprietary format for tracking and charging third-party expenses. The process of creating NRBs is covered in this article.
The better you understand the relationship between a Purchase Order, and the individual items that make up that order, the more comfortable your team will be with listing multiple items on a single order.
It is also possible to to create NRBs without a Purchase Order, but NRBs cannot be retroactively linked back to an existing PO. More information available here: Non-Recurring Billable Items (NRBs)
How to Create a Purchase Order
On the web, there are two ways to create a Purchase Order:
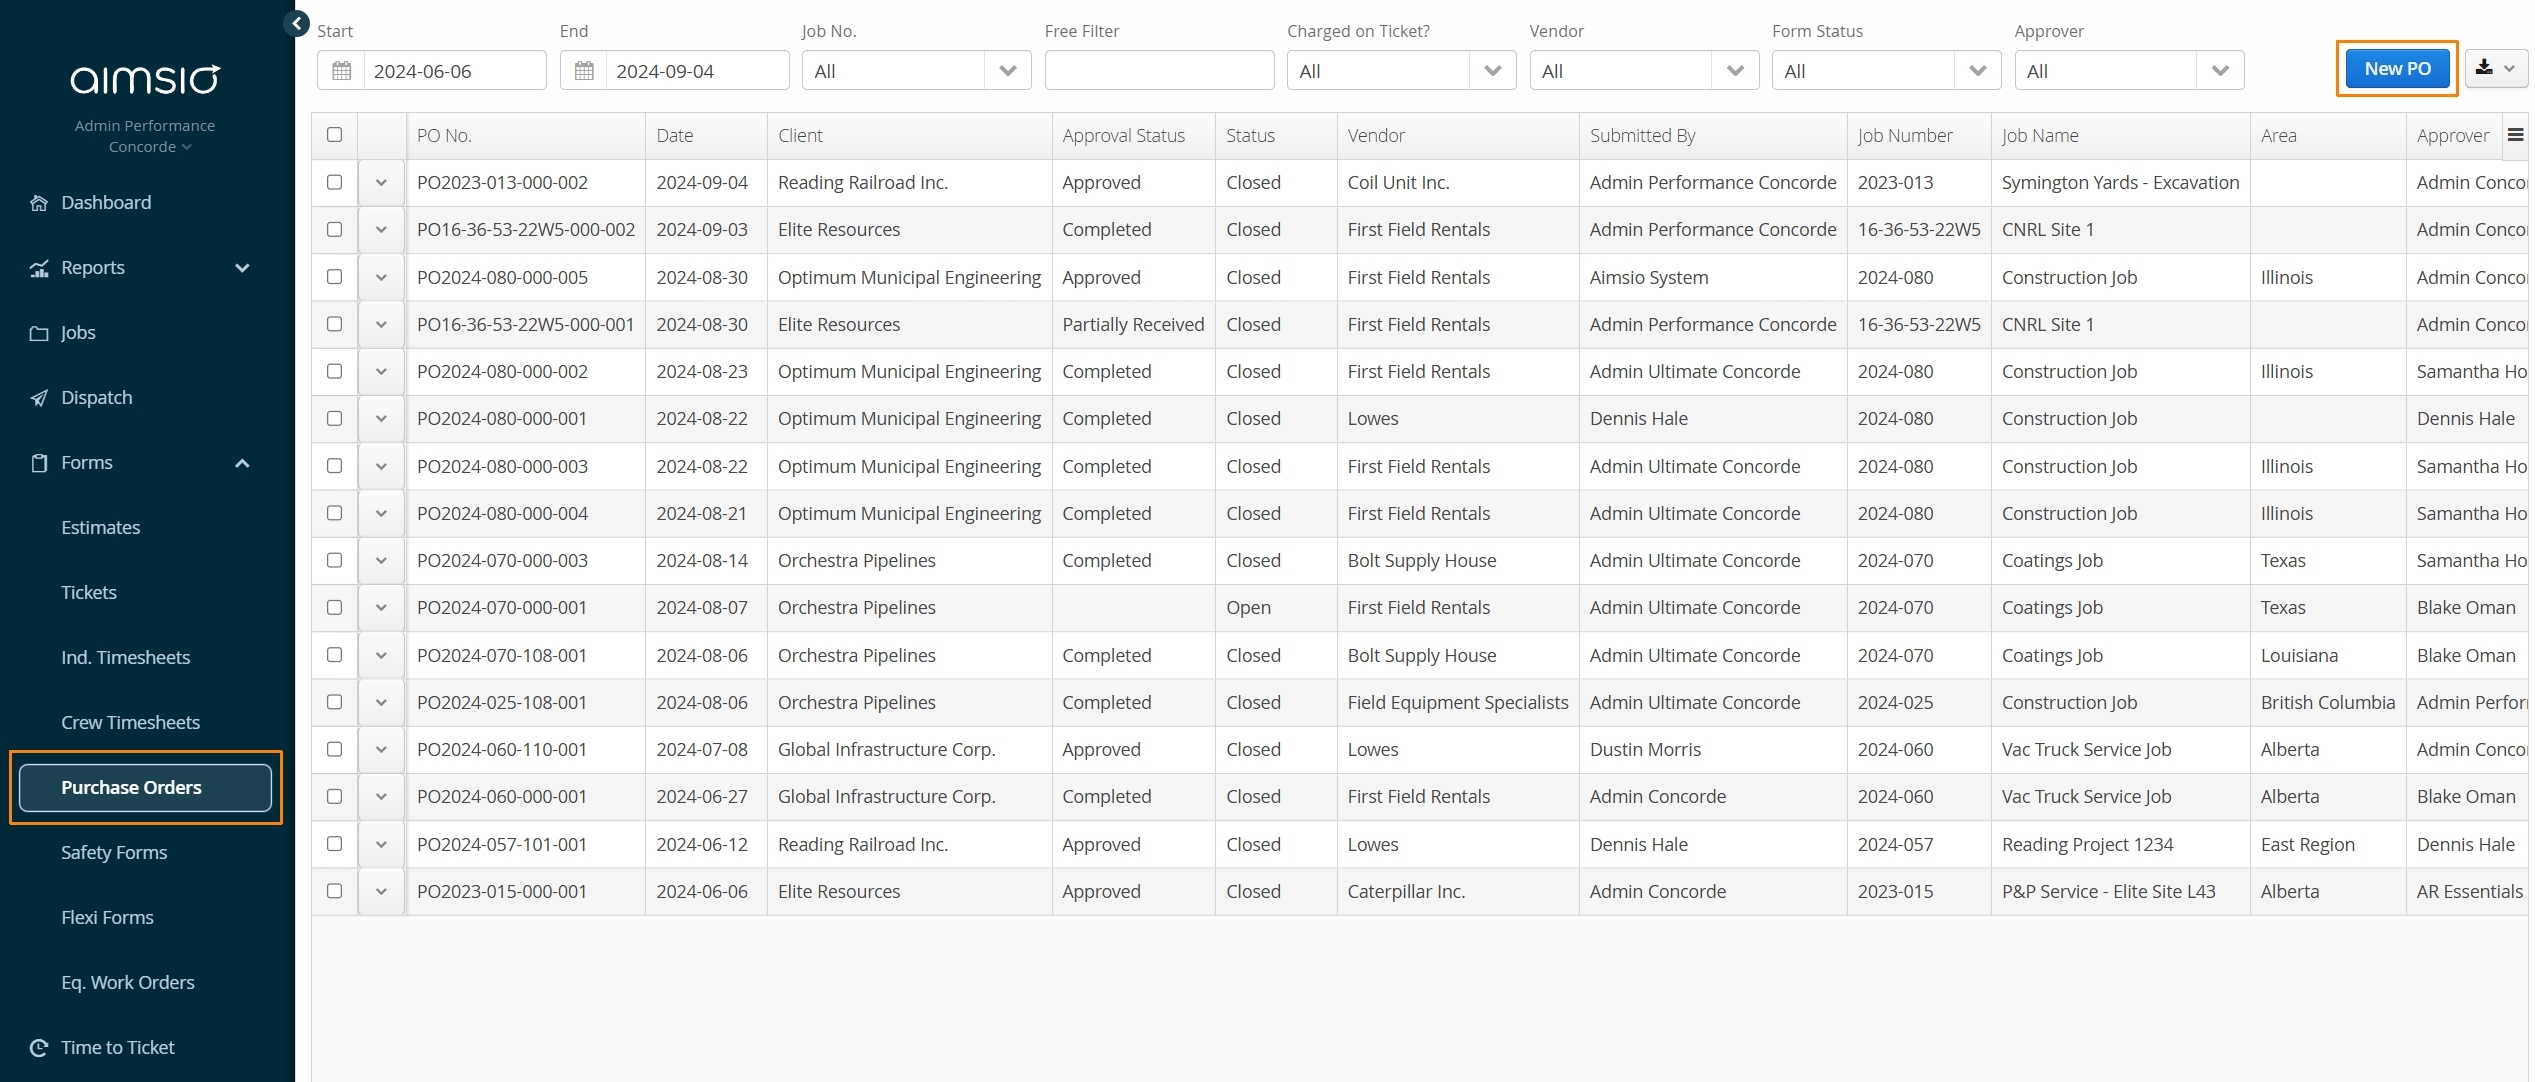
- Navigate to the Purchase Orders page using Aimsio’s left sidebar and click New PO.
- A window will popup asking you to select the Job that you want to create a Purchase Order for.
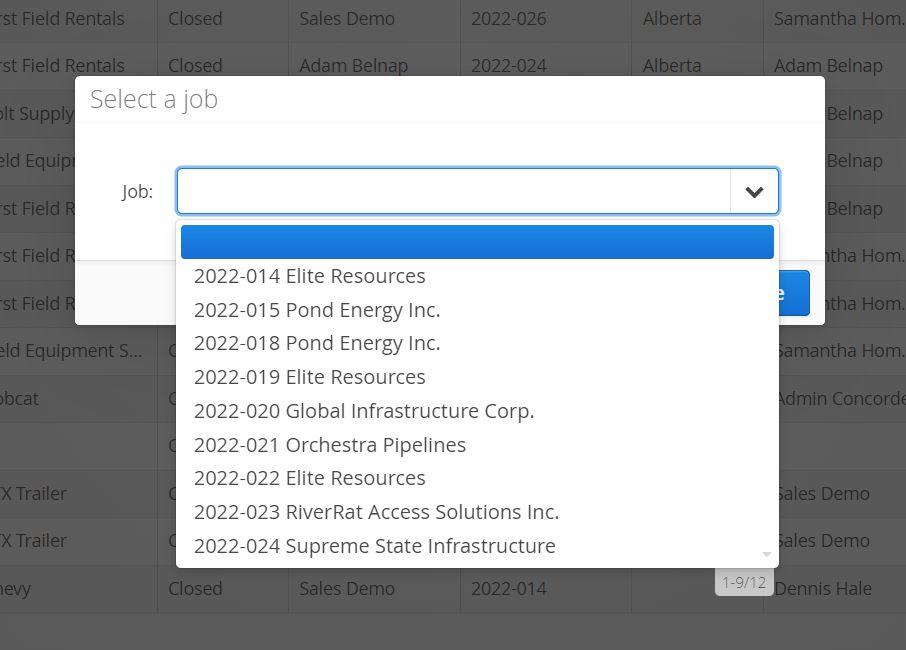
A Job must exist before a Purchase Order can be created.
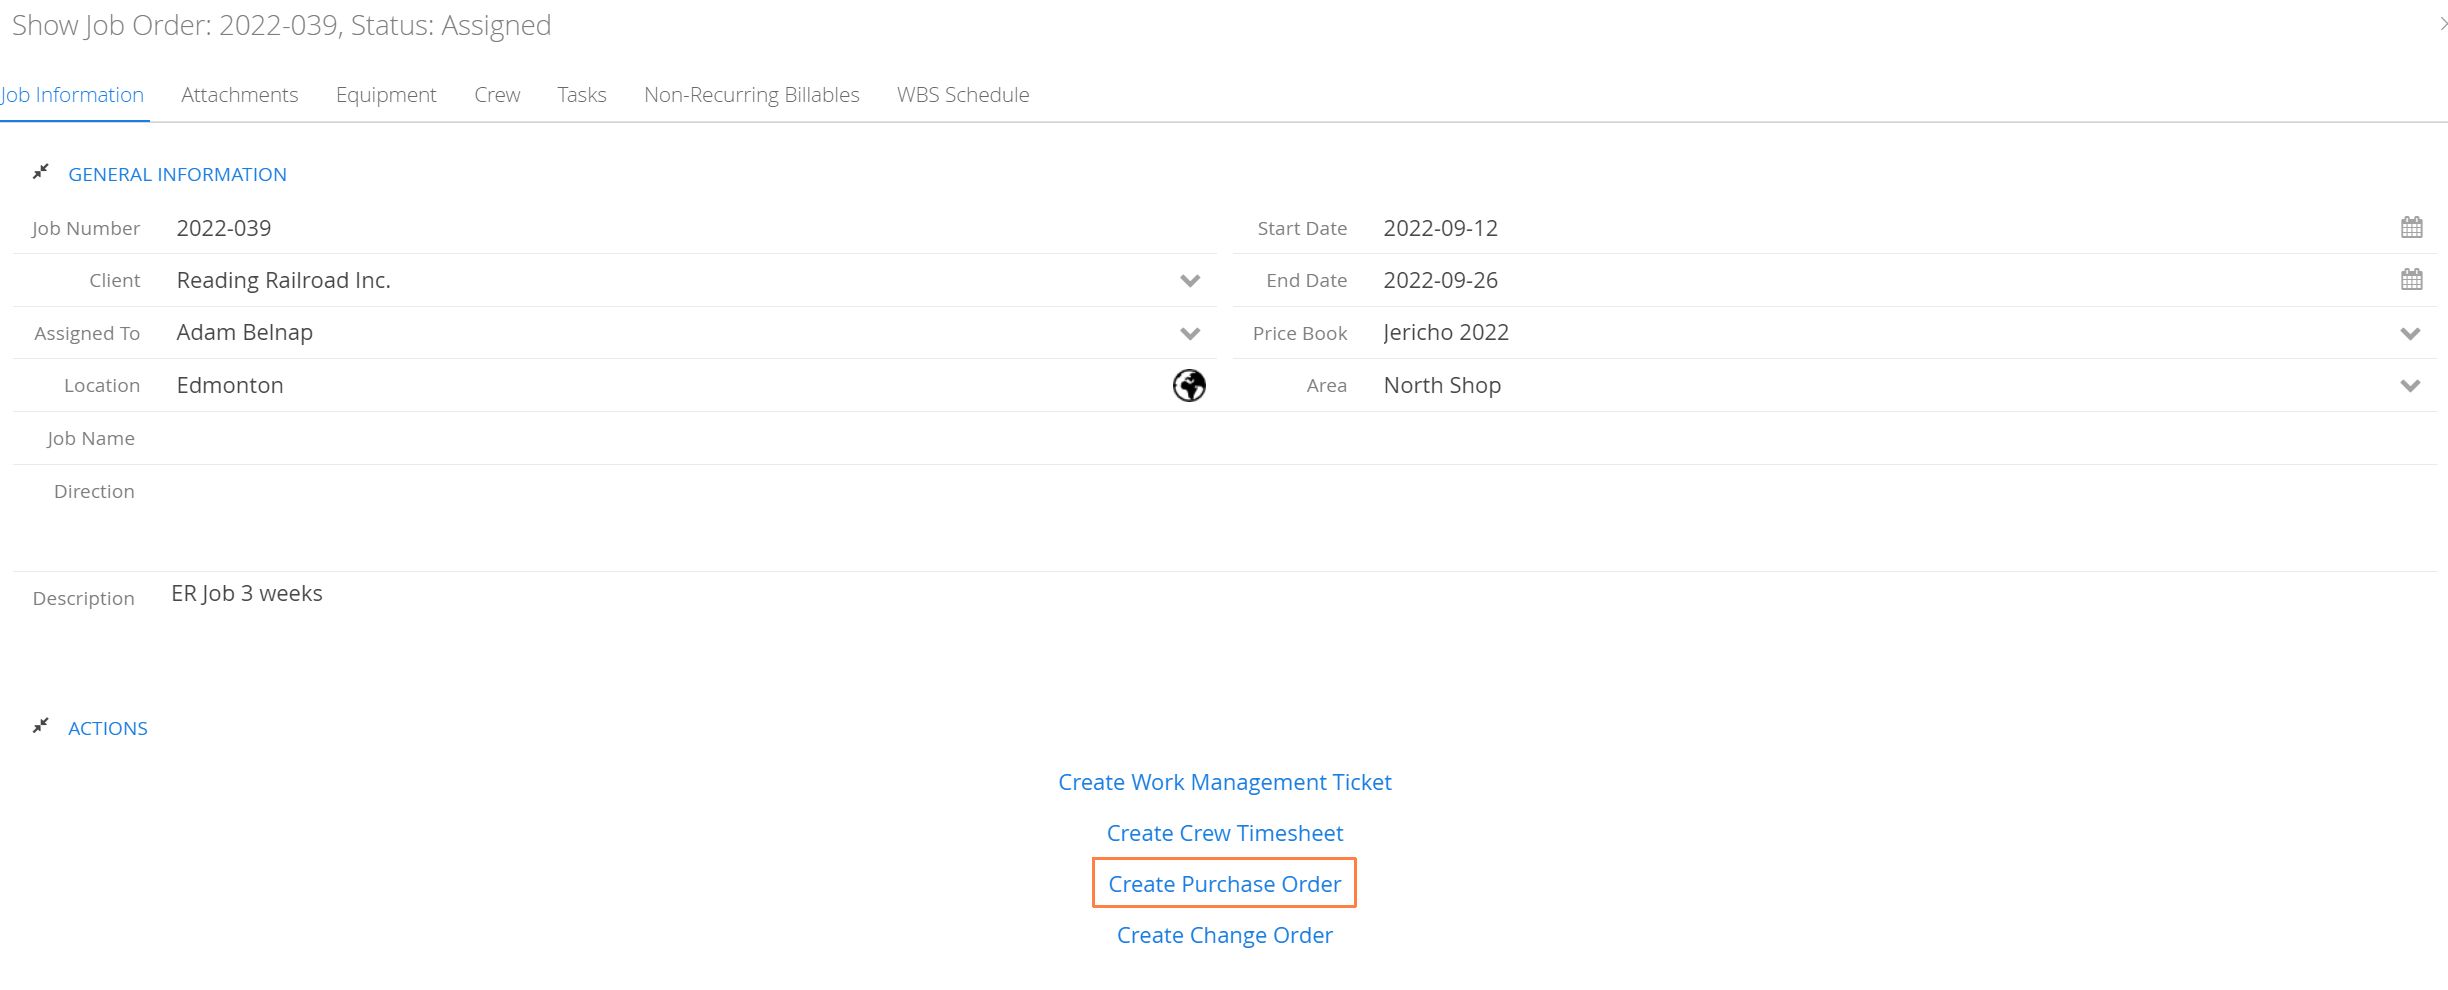
- Users can also create a Purchase Order by opening the Job it pertains to. Locate the Job and select View or Edit from the Jobs page, then select the Create Purchase Order while inside the Job.
How to Complete a Purchase Order
To create a Purchase Order, Vendor, PO Type and Approver are required fields. Additional fields will vary per account. Purchase Orders require approval before items can be billed back to a client (this process is covered later in the article).
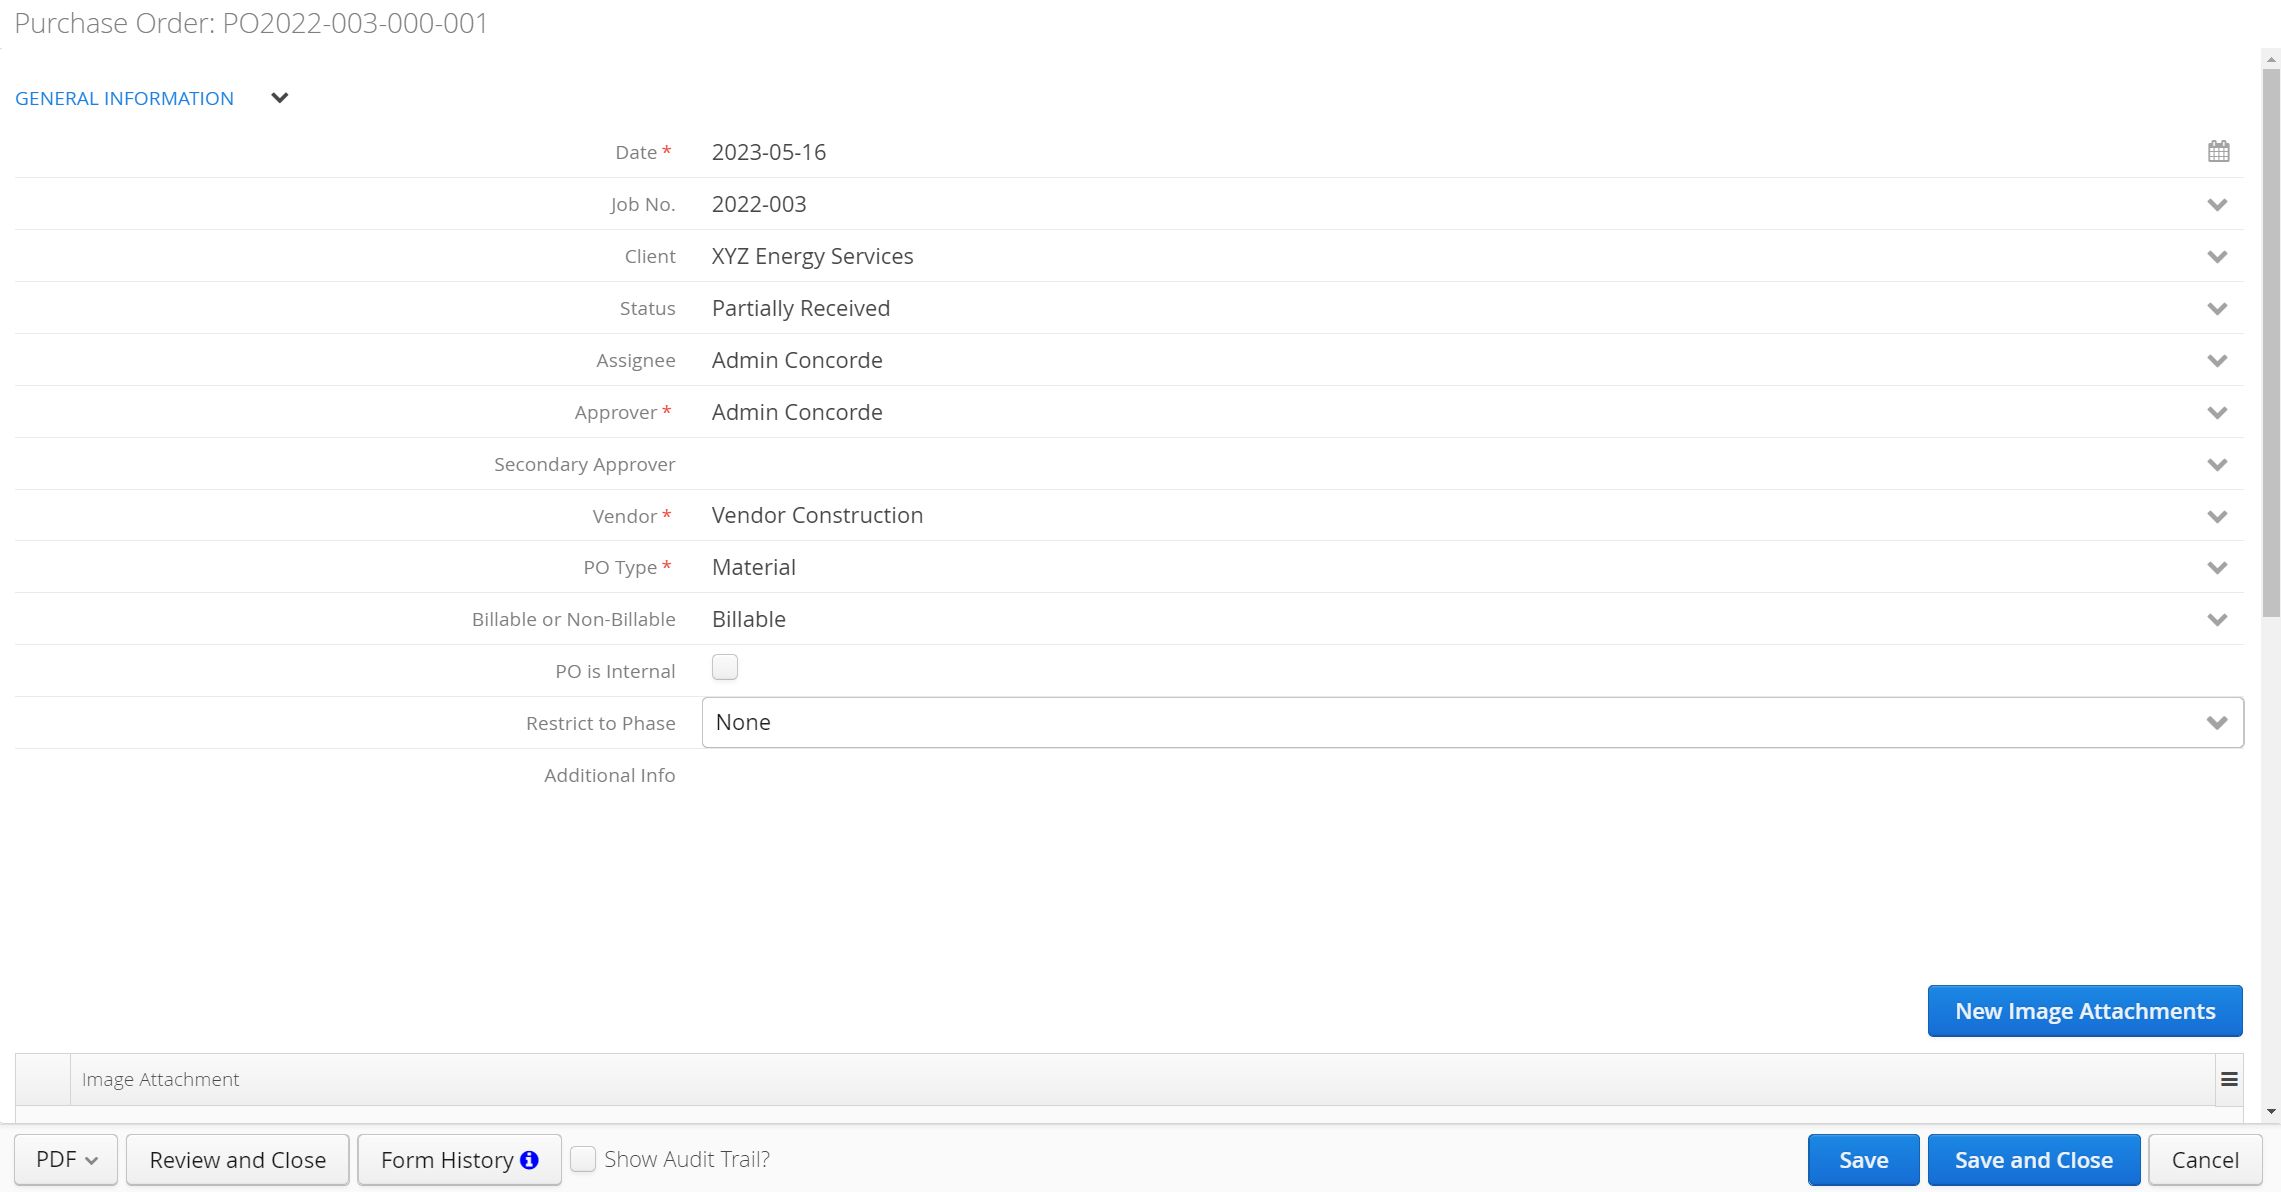
To add Purchases, use the New Items to Purchase button. List the items that you have, or intend to purchase. Include a description, quantity and rate, Aimsio will tally up the total of your purchases.
- Users can add as many purchase lines to a PO as needed.

When the order is complete, select “Save and Submit”. If users intend to return to the form before finishing it, they can temporarily save their work by selecting “Save and Close”.
For more information on saving forms please review our Form Fundamentals guide.
If changes to a form are made after using Save and Submit, users should generate a new version of the PDF to assist with the approval process.
Requisition Numbers
Accounts that require more control over their PO approval process can use alternative numbers to track newly submitted Purchase Orders.
Requisition numbers help distinguish recently submitted Purchase Orders from those that have been approved. When Purchase Orders are approved, an official PO number will be generated.
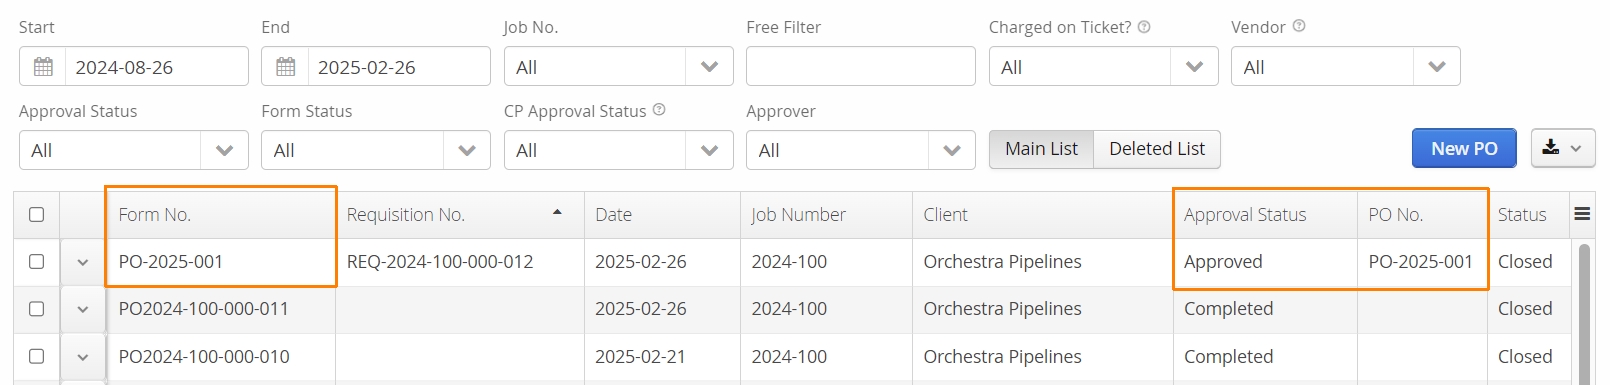
Accounts using this approach will have two columns on their Purchase Order page:
-
Requisition No.
-
PO No.
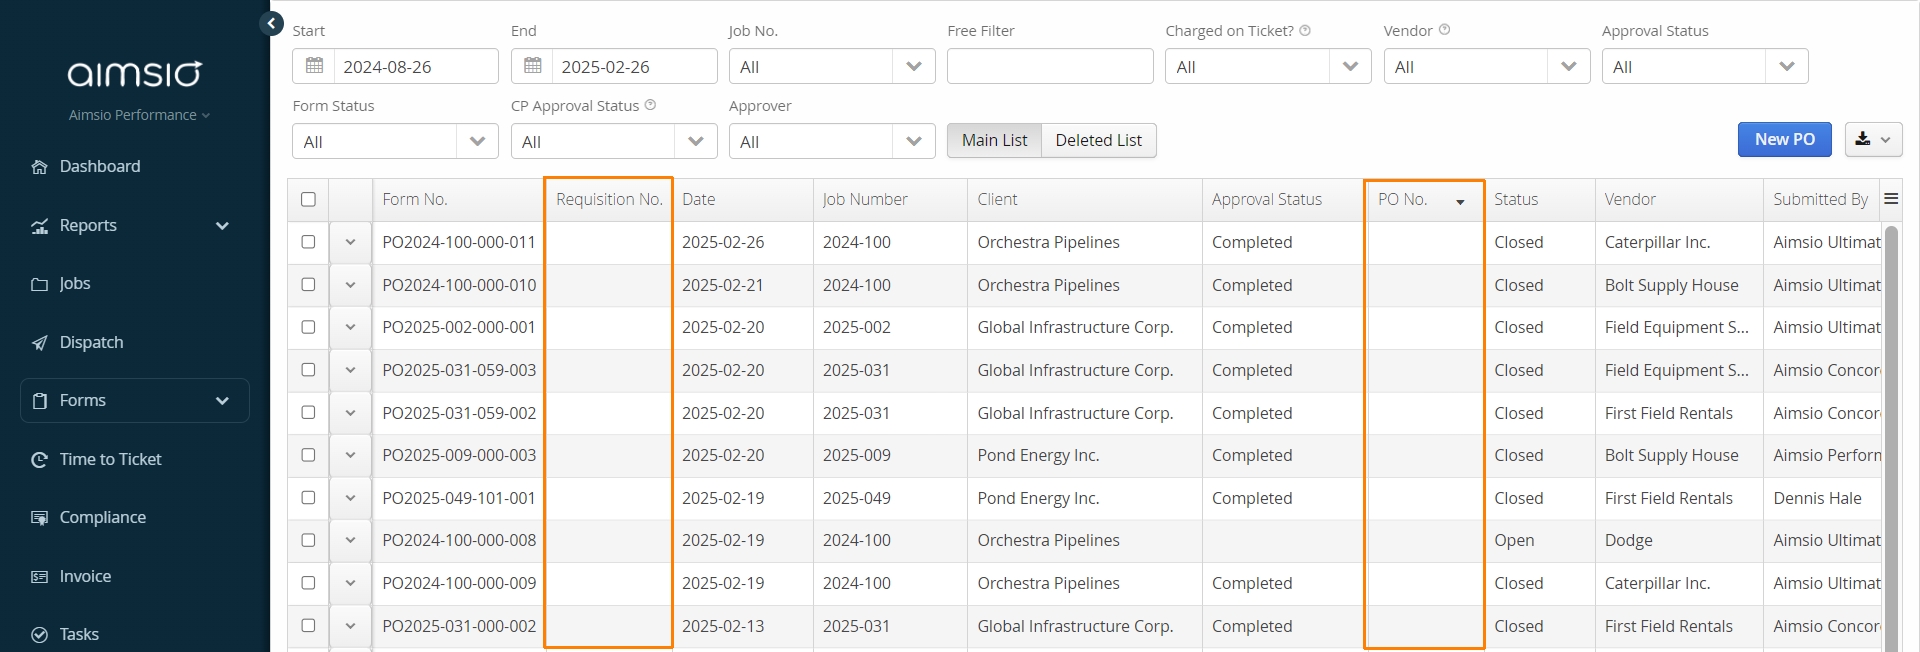
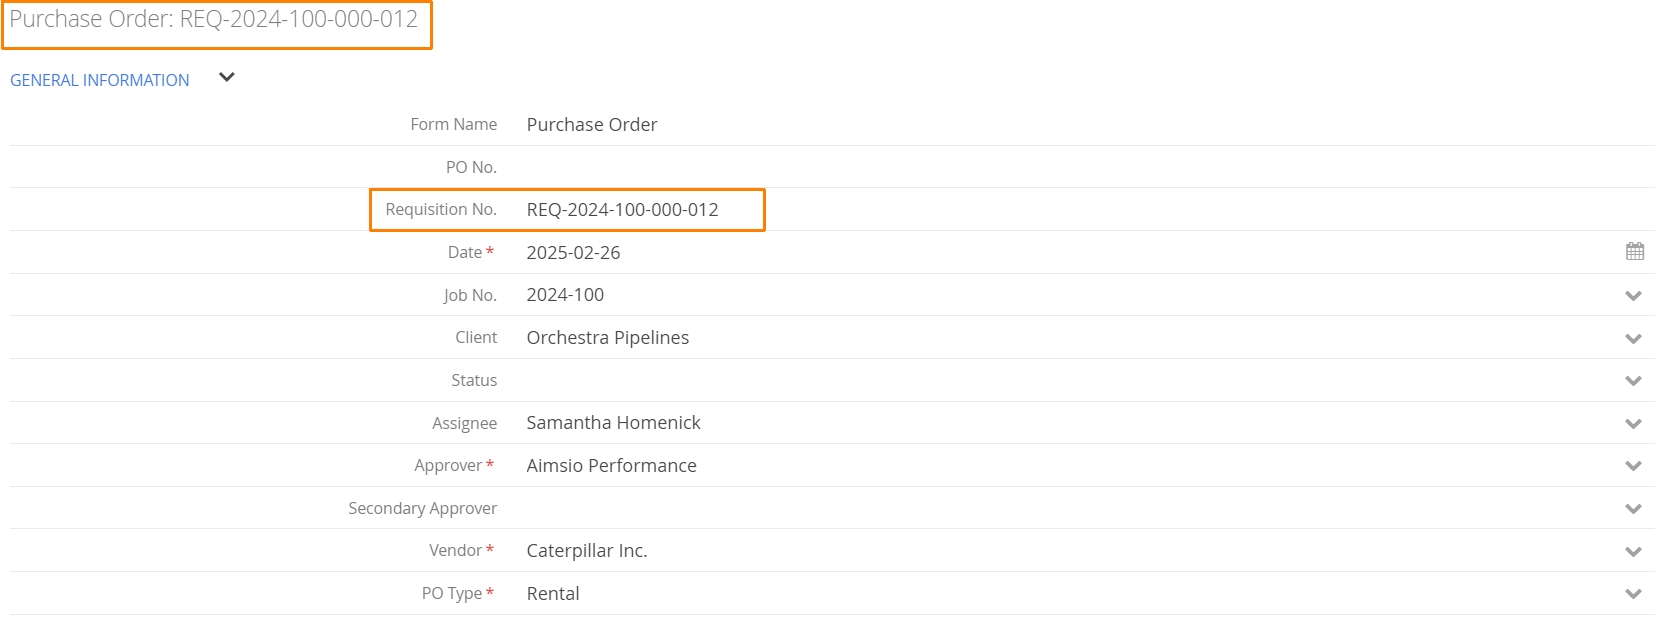
When a new Purchase Order is created, a Requisition No. is automatically generated.
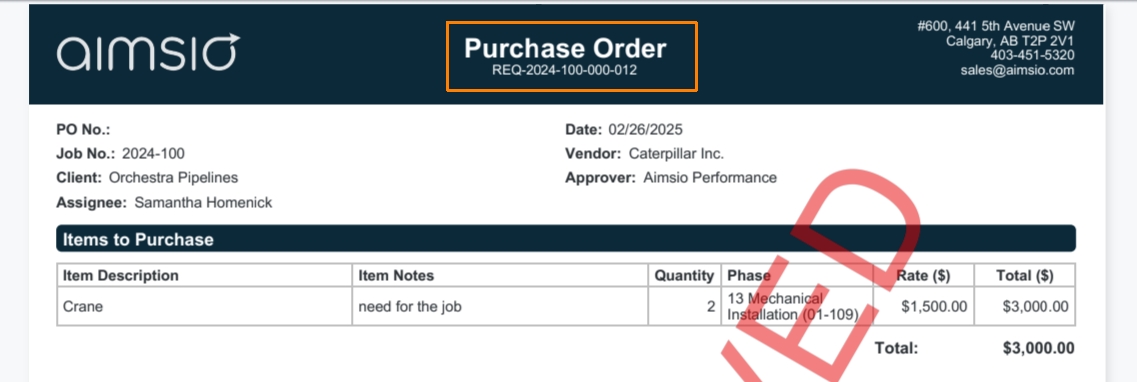
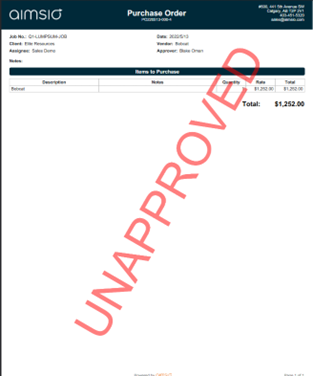
The PDF version of the unapproved Purchase Order will reflect the requisition number.
The approval process for Purchase Orders has not changed. Designated approvers will be notified that the form requires their approval. They can text back the requisition number or use the ‘Approve’ action in Aimsio to approve it.
Once the PO has been approved, a PO No. will be generated. Note that the Form Number and PO No. match.
How to Approve a Purchase Order
One of the required fields on a Purchase Order is the Approver. Once this field has been assigned (and the Purchase Order is submitted), the ‘Approver’ will be notified via SMS notification.
- The assigned approver is given access to the PDF version of the Purchase Order via their mobile device and can text back the PO Number to approve it. Convenient for approvers that don’t have immediate access to Aimsio’s web portal.
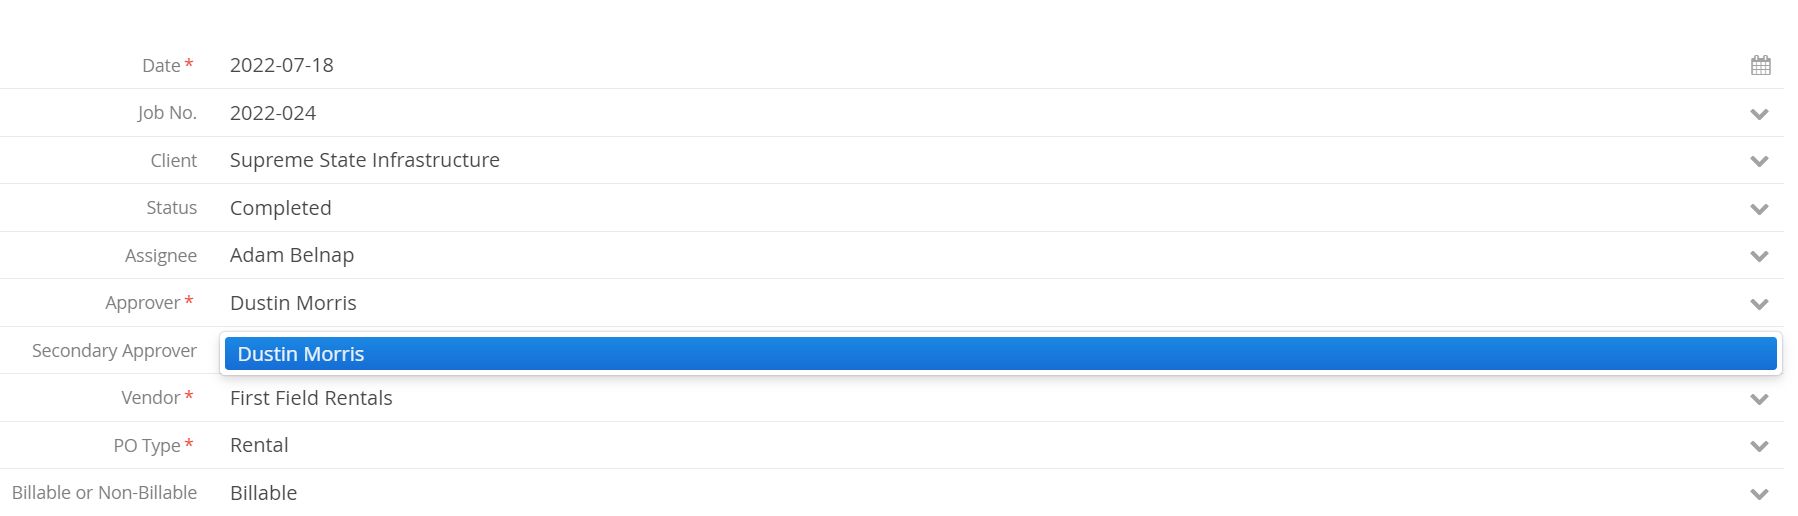
Purchase Orders also support a ‘Secondary Approver’. This field functions exactly like the Approver field, allowing more than one user to approve the PO. Secondary Approvers will also receive an SMS notification when the Purchase Order is submitted. Purchase Orders can only be approved once.
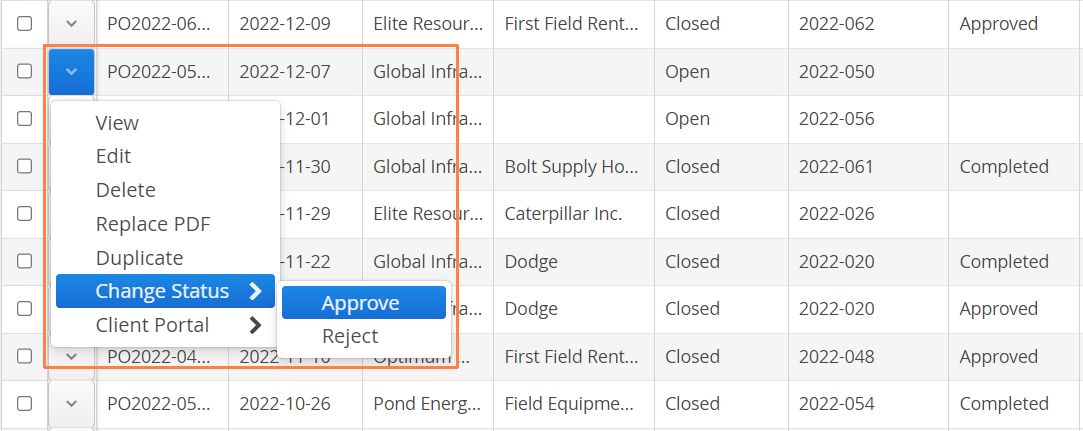
- On the web, you can Approve or Reject a Purchase Order by selecting the PO you want to review from the Purchase Orders page, clicking on the Action button to the left of the order and selecting Change Status > Approve/Reject.
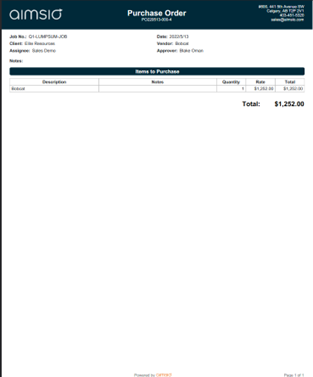
- When users select Approve, the form PDF will be re-generated to remove the UNAPPROVED watermark. Otherwise, the PDF stays the same.
Can we automate the approval process for Purchase Orders?
Currently, all approvals are a manual action, as the number of status approvals may vary at your firm. It is possible to make secondary approval fields required when submitting a PO. Secondary approvers can also receive a notification when a Purchase Order is submitted.
How to Receive a Purchase Order
After a Purchase Order is ‘Approved’, authorized users can receive the order and convert the items to Non-Recurring Billables (NRBs). NRBs are how Aimsio’s designates third-party expenses back to Jobs so they can be billed back on Tickets.
- There are three options for receiving against a Purchase Order. However, Receive Remainder can only be used if a Purchase Order is already ‘Partially Received’, so we will focus on the two primary options: ‘Receive Partially’ and ‘Receive Completely’.
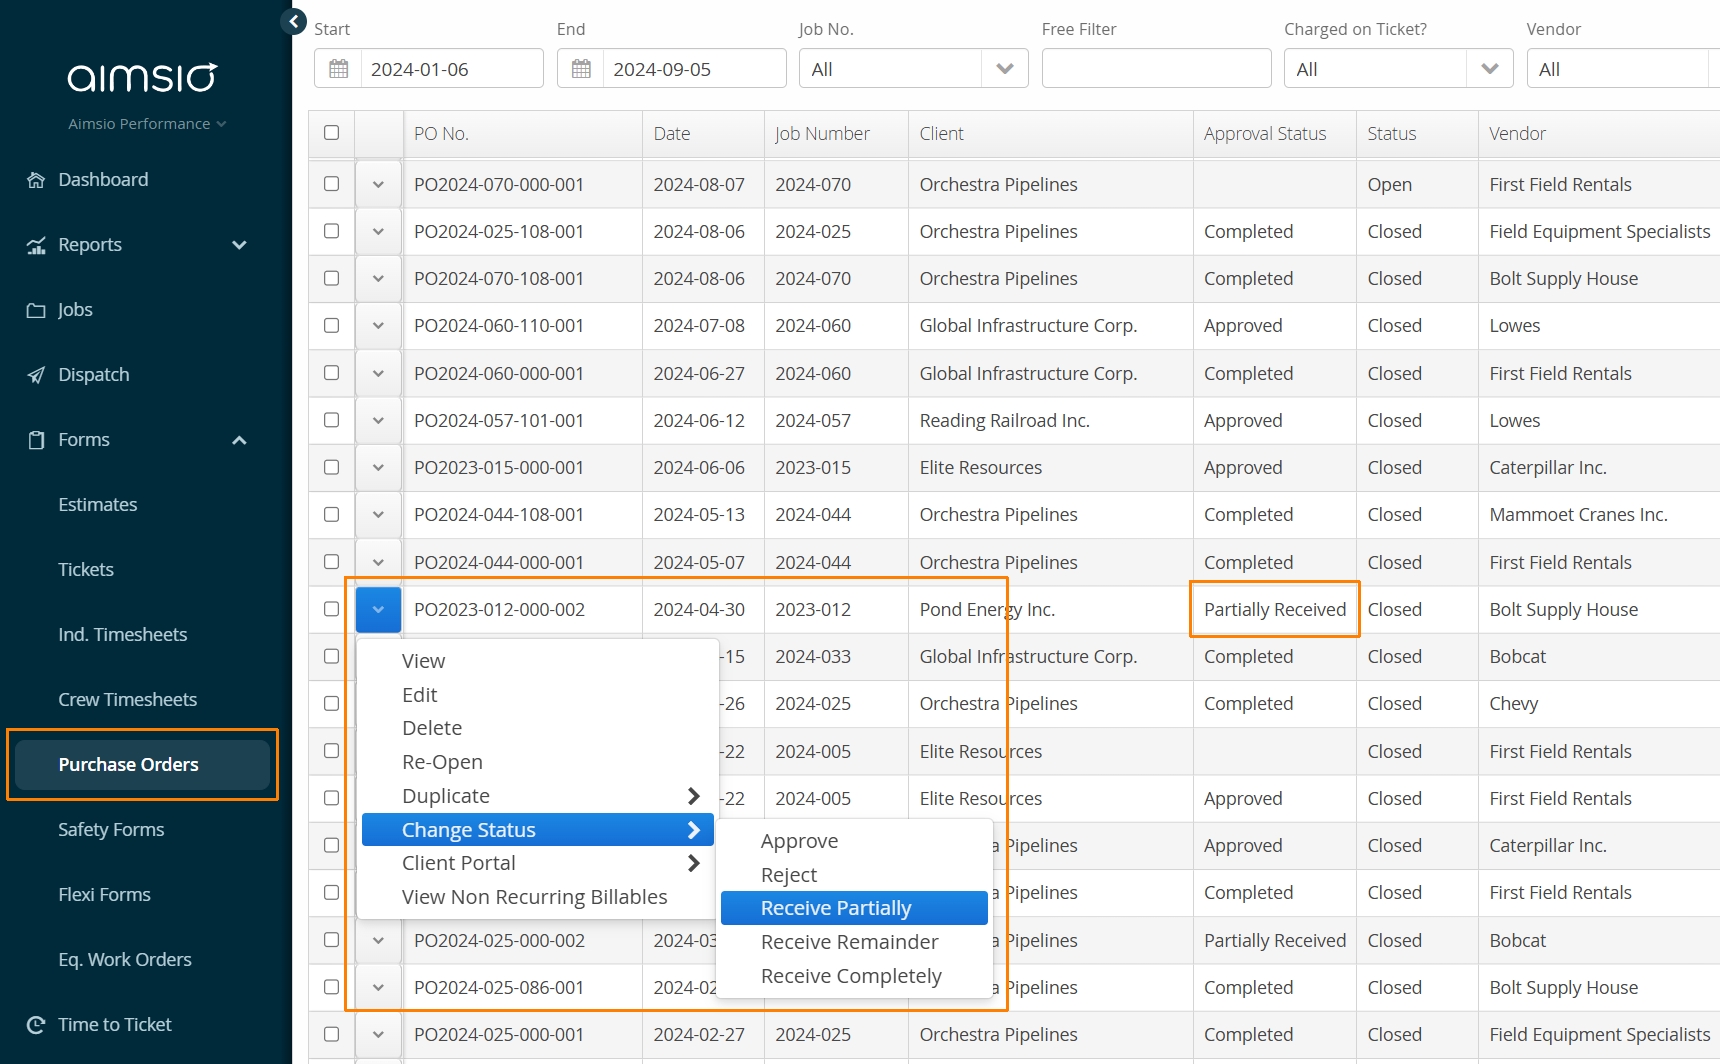
Receive Partially
Receive Partially can be used when you want to charge out partial amounts of your Purchase Order or charge out different quantities of the listed items. Partial amounts may be attributed to different WBS Activities or charged out on separate Tickets.
For example, if you have purchased multiple items from a vendor, but you would like to charge out a portion on a Ticket / LEM, select Receive Partially and choose which items you would like to declare quantities for.
There are two distinct ways to create your NRBs. You should choose the method that best fits your documentation requirements:
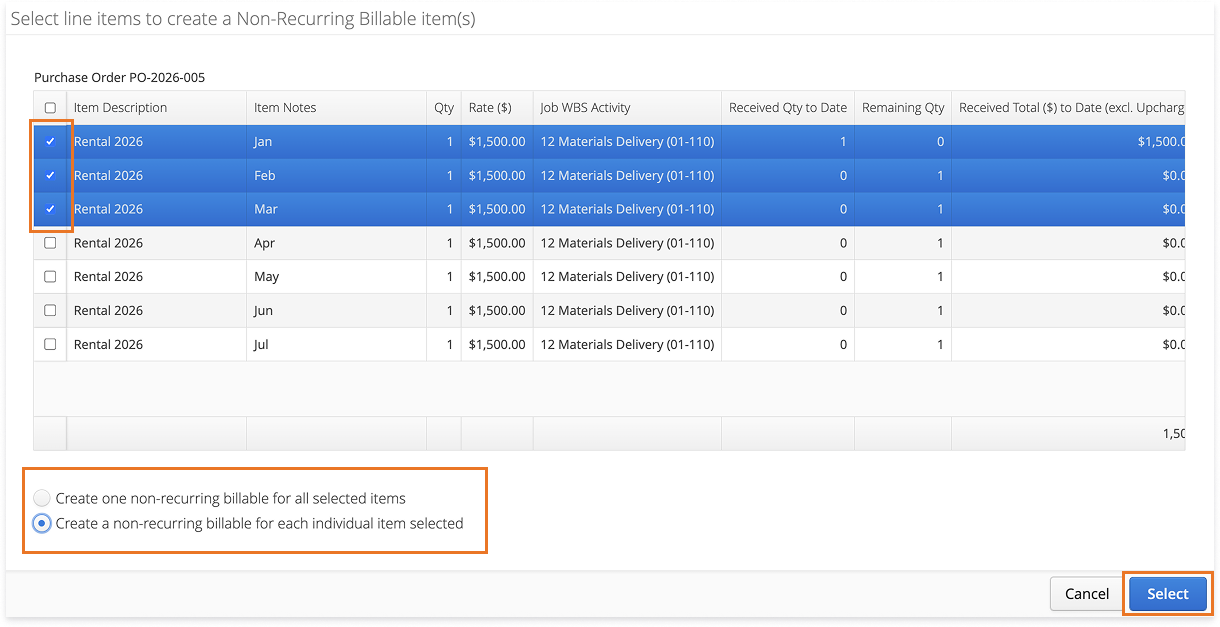
Option 1) Create a non-recurring billable for each individual item selected
Best for: When you have a long list of items (e.g., 20+ lines) and want to process them all at once without losing detail when billing in Tickets.
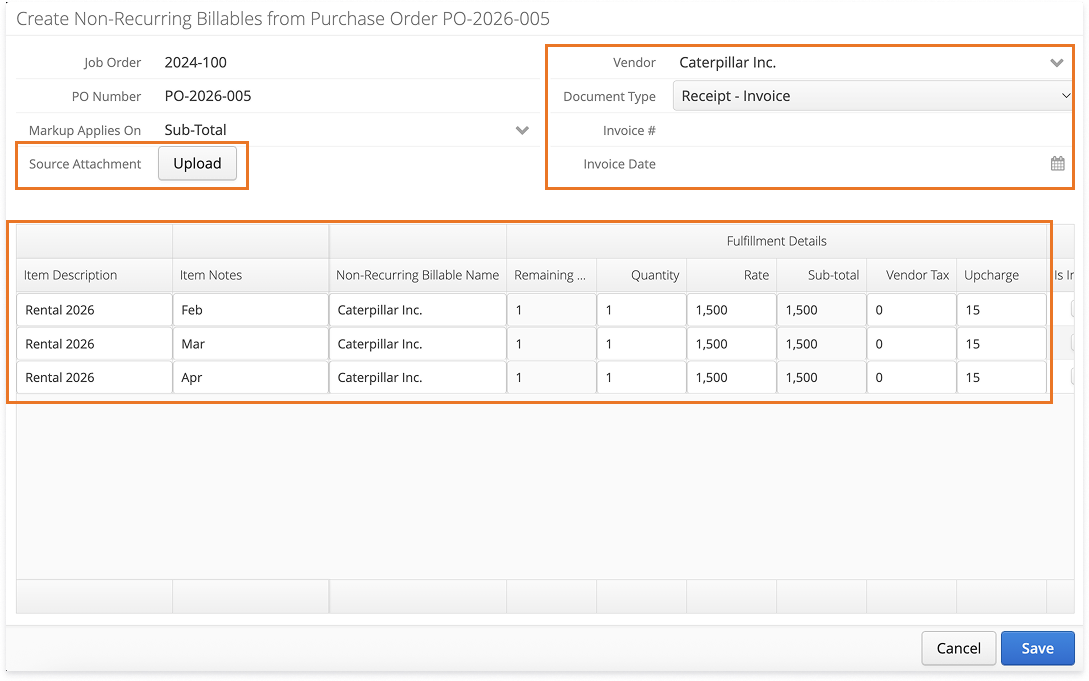
You can select multiple PO lines and attach shared details, like a Vendor Invoice PDF or an Invoice Number, just once. The system will automatically generate separate NRB records for every line.
Even in this batch view, you can still override the Quantity Received, Rate, Vendor Tax, and Upcharge on a line-by-line basis before saving.
Option 2) Create one recurring billable from all selected lines
Best for: Consolidating multiple small items into a single total charge on a ticket.
Note: This method is efficient for speed but hides specific line-item notes and descriptions in the final NRB. Use this only if you do not need to show granular item details to your client.
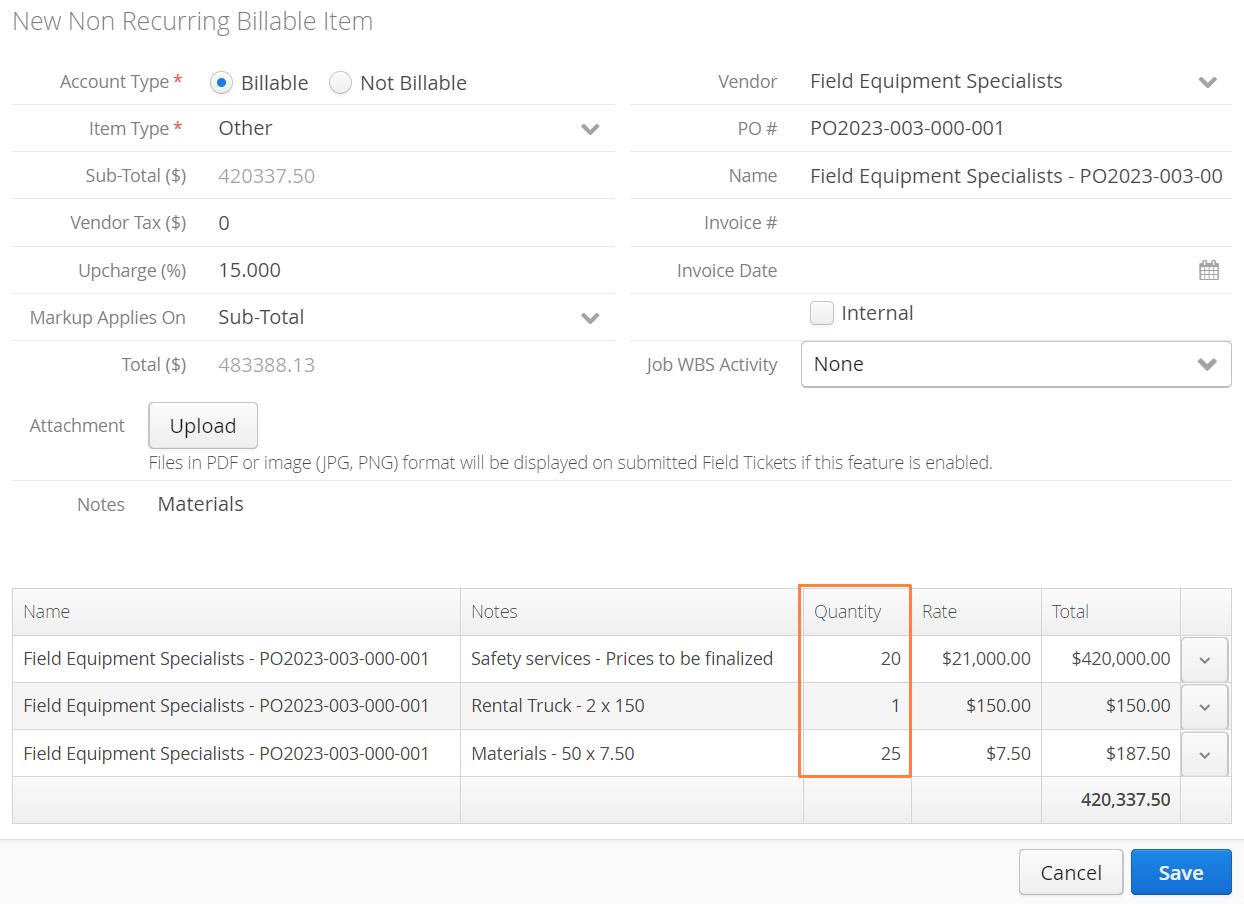
After selecting, users will see a popup window that allows them to modify the details of the new Non-Recurring Billable Item. Most of the fields here will carry over from the original Purchase Order.
-
When charging a NRB back, the Name and Additional Info fields will determine how this item appears on the ticket.
-
To adjust an item’s Quantity, double-click the quantity value in the item description table.
-
The Remaining Quantity field shows you exactly how many units are left to be received on the PO, acting as a reference so you don’t over-receive.
-
Users can include an Attachment when receiving an item (ie: a vendor invoice PDF). When the item is charged on a Ticket, the attachment will automatically append itself to an additional page on the PDF version of the Ticket.
-
Vendor Tax can also be applied to the Sub-total of the entire NRB.
After saving, the item will be registered as a Non-Recurring Billable under the Job. They will be visible under a Job’s Non-Recurring Billables tab.
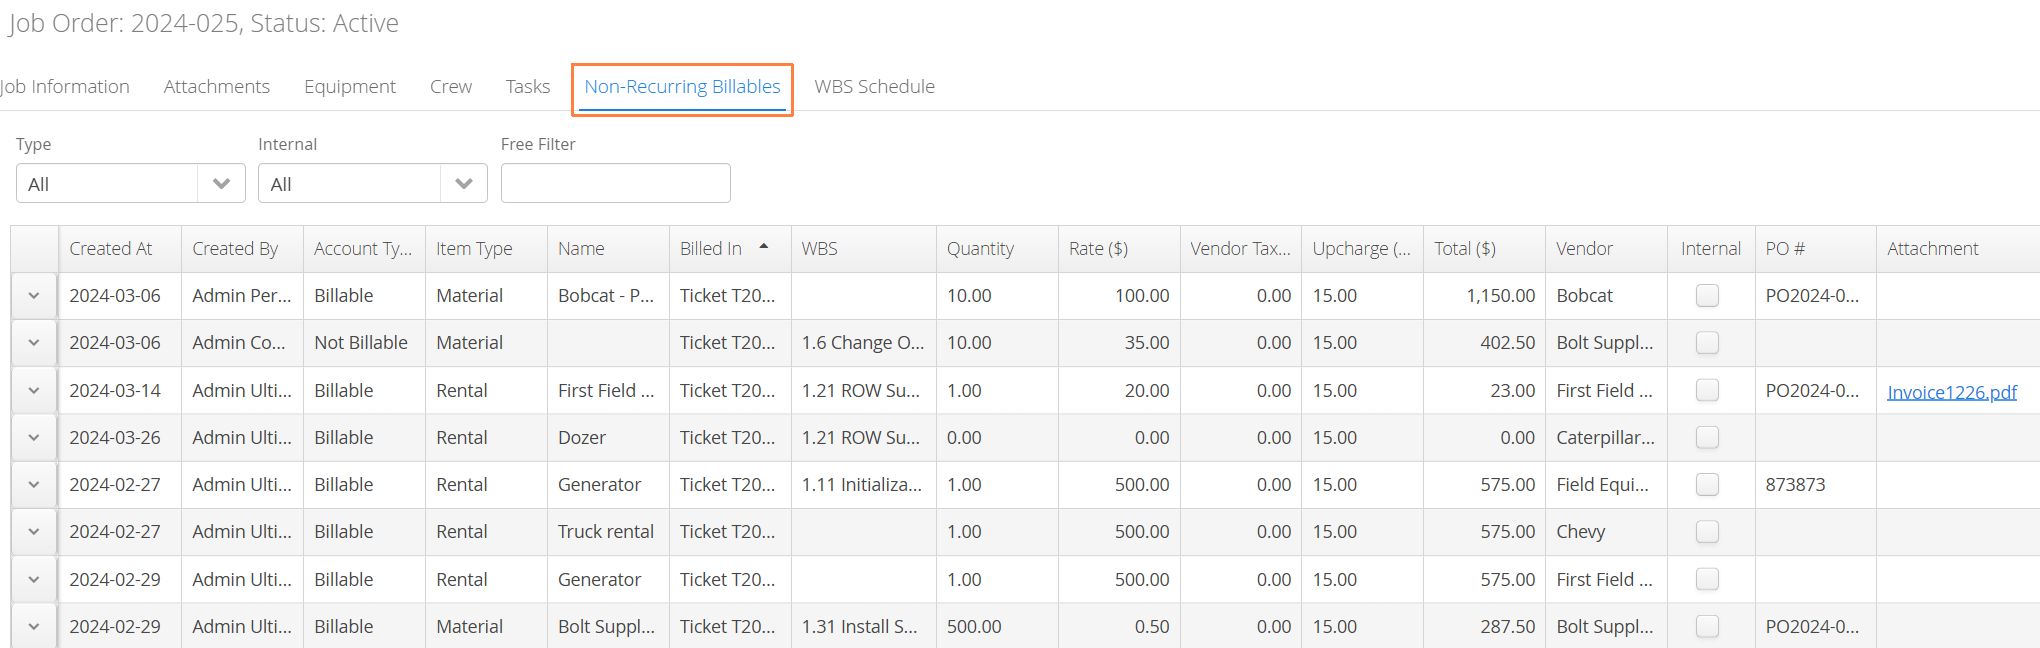
NRBs can also be viewed from the Purchase Orders page by clicking the action button to the left of the Purchase Order and selecting View Non-Recurring Billables (NRBs).
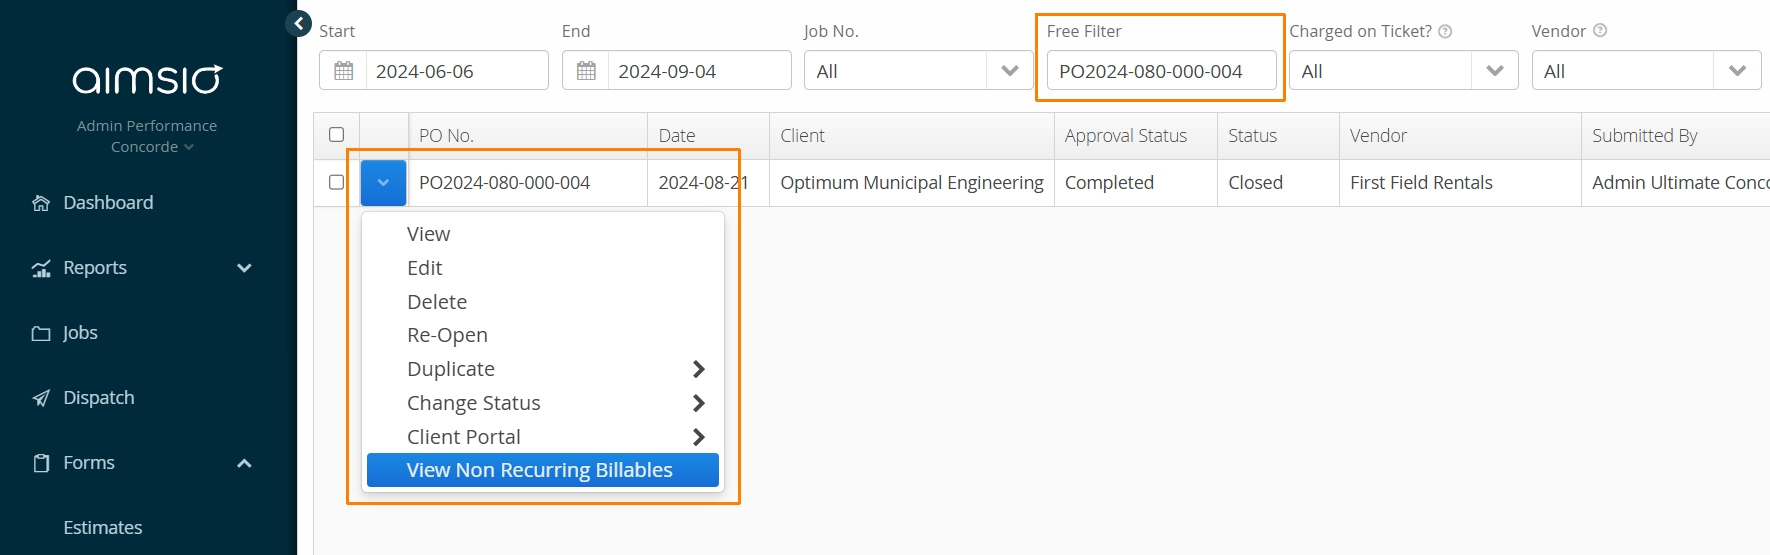
A Job’s Non-Recurring Billables tab will display all NRBs received for every Purchase Order created. The View NRBs action will only display NRBs received for that specific Purchase Order.
All items that have yet to be billed will appear under the Non-Recurring Billables table on a Ticket. Users can charge NRBs from this table by using the action menu to the left of the item (we cover this again shortly).

If users Receive Partially again, the system recognizes the previously received quantity, and will adjust the remaining quantity to receive.
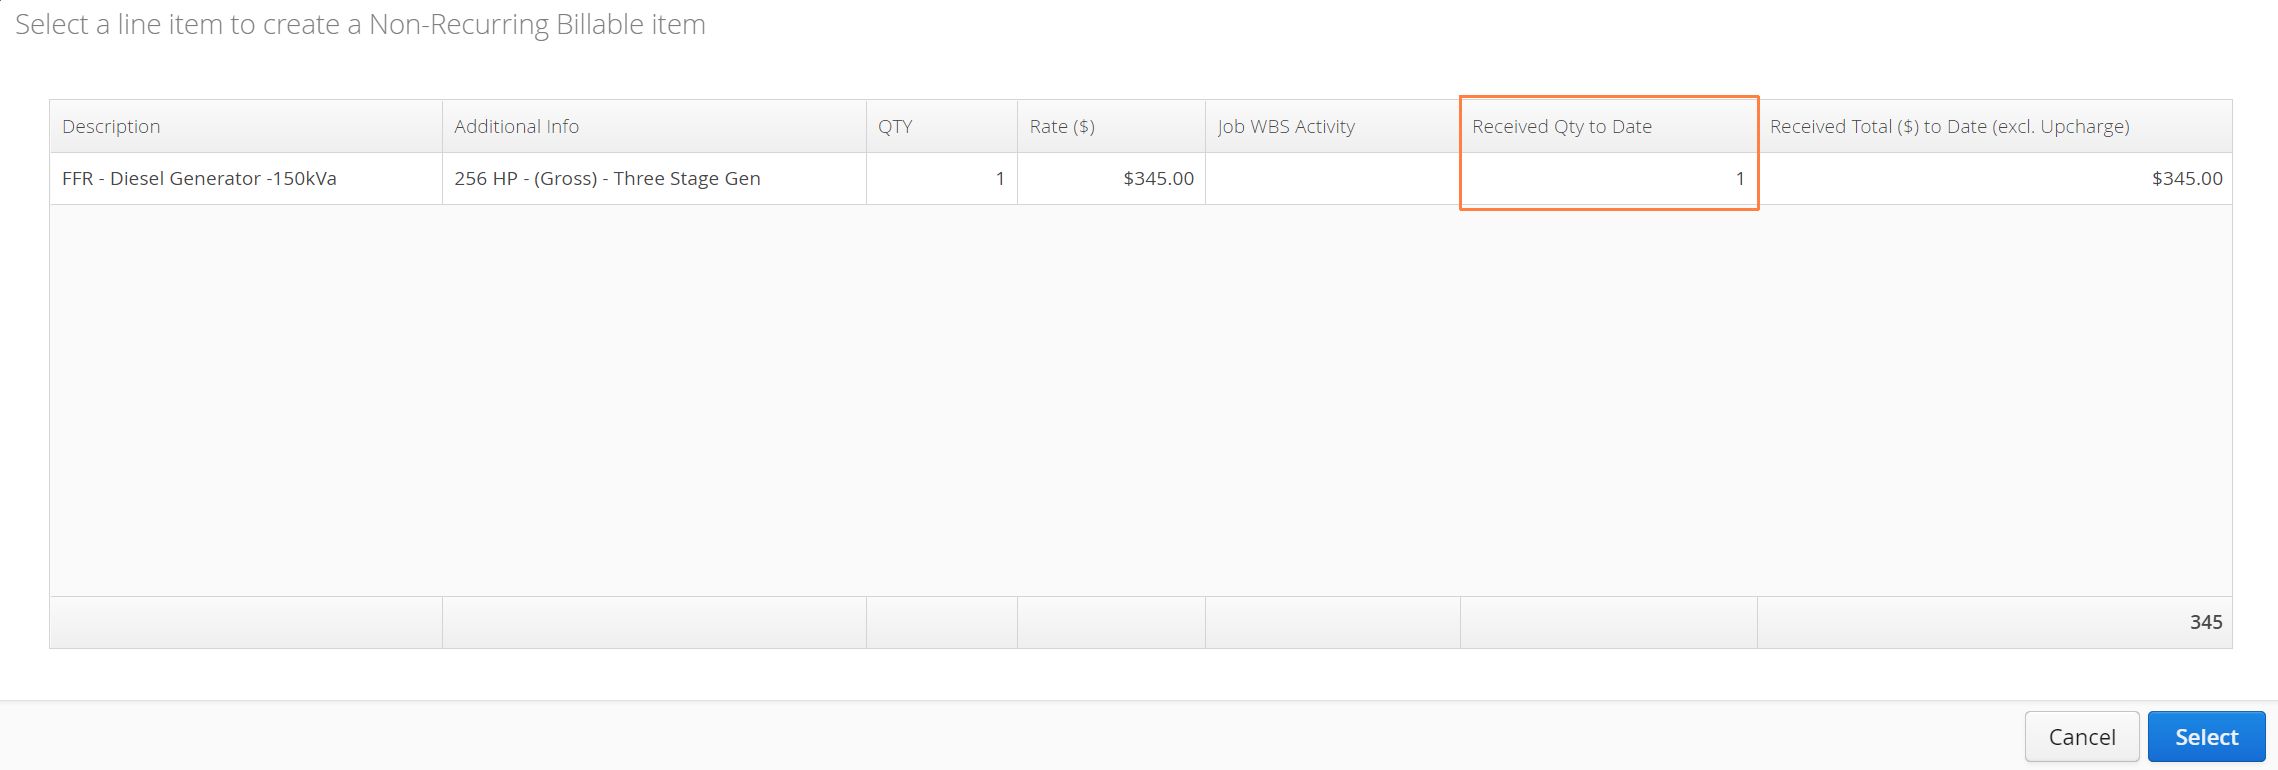
If users select Receive Remainder, the quantity amount will total whatever is left, and the rate will equate to the total cost of the remaining units. This option is helpful when you are on the last phase of your billing.
Receive Completely
If users need to consolidate all items to a single charge back for expenses, or do not require capturing the Purchase Order items individually, they can use Receive Completely.
Receive Completely works very similar to Receive Remainder. The action allows you to charge back the whole Purchase Order as a single NRB on a Ticket.
How to Charge NRBs
Once Non-Recurring Billables are received, both web and mobile users can charge them back on a Ticket or LEM via the a Non-Recurring Billables table.
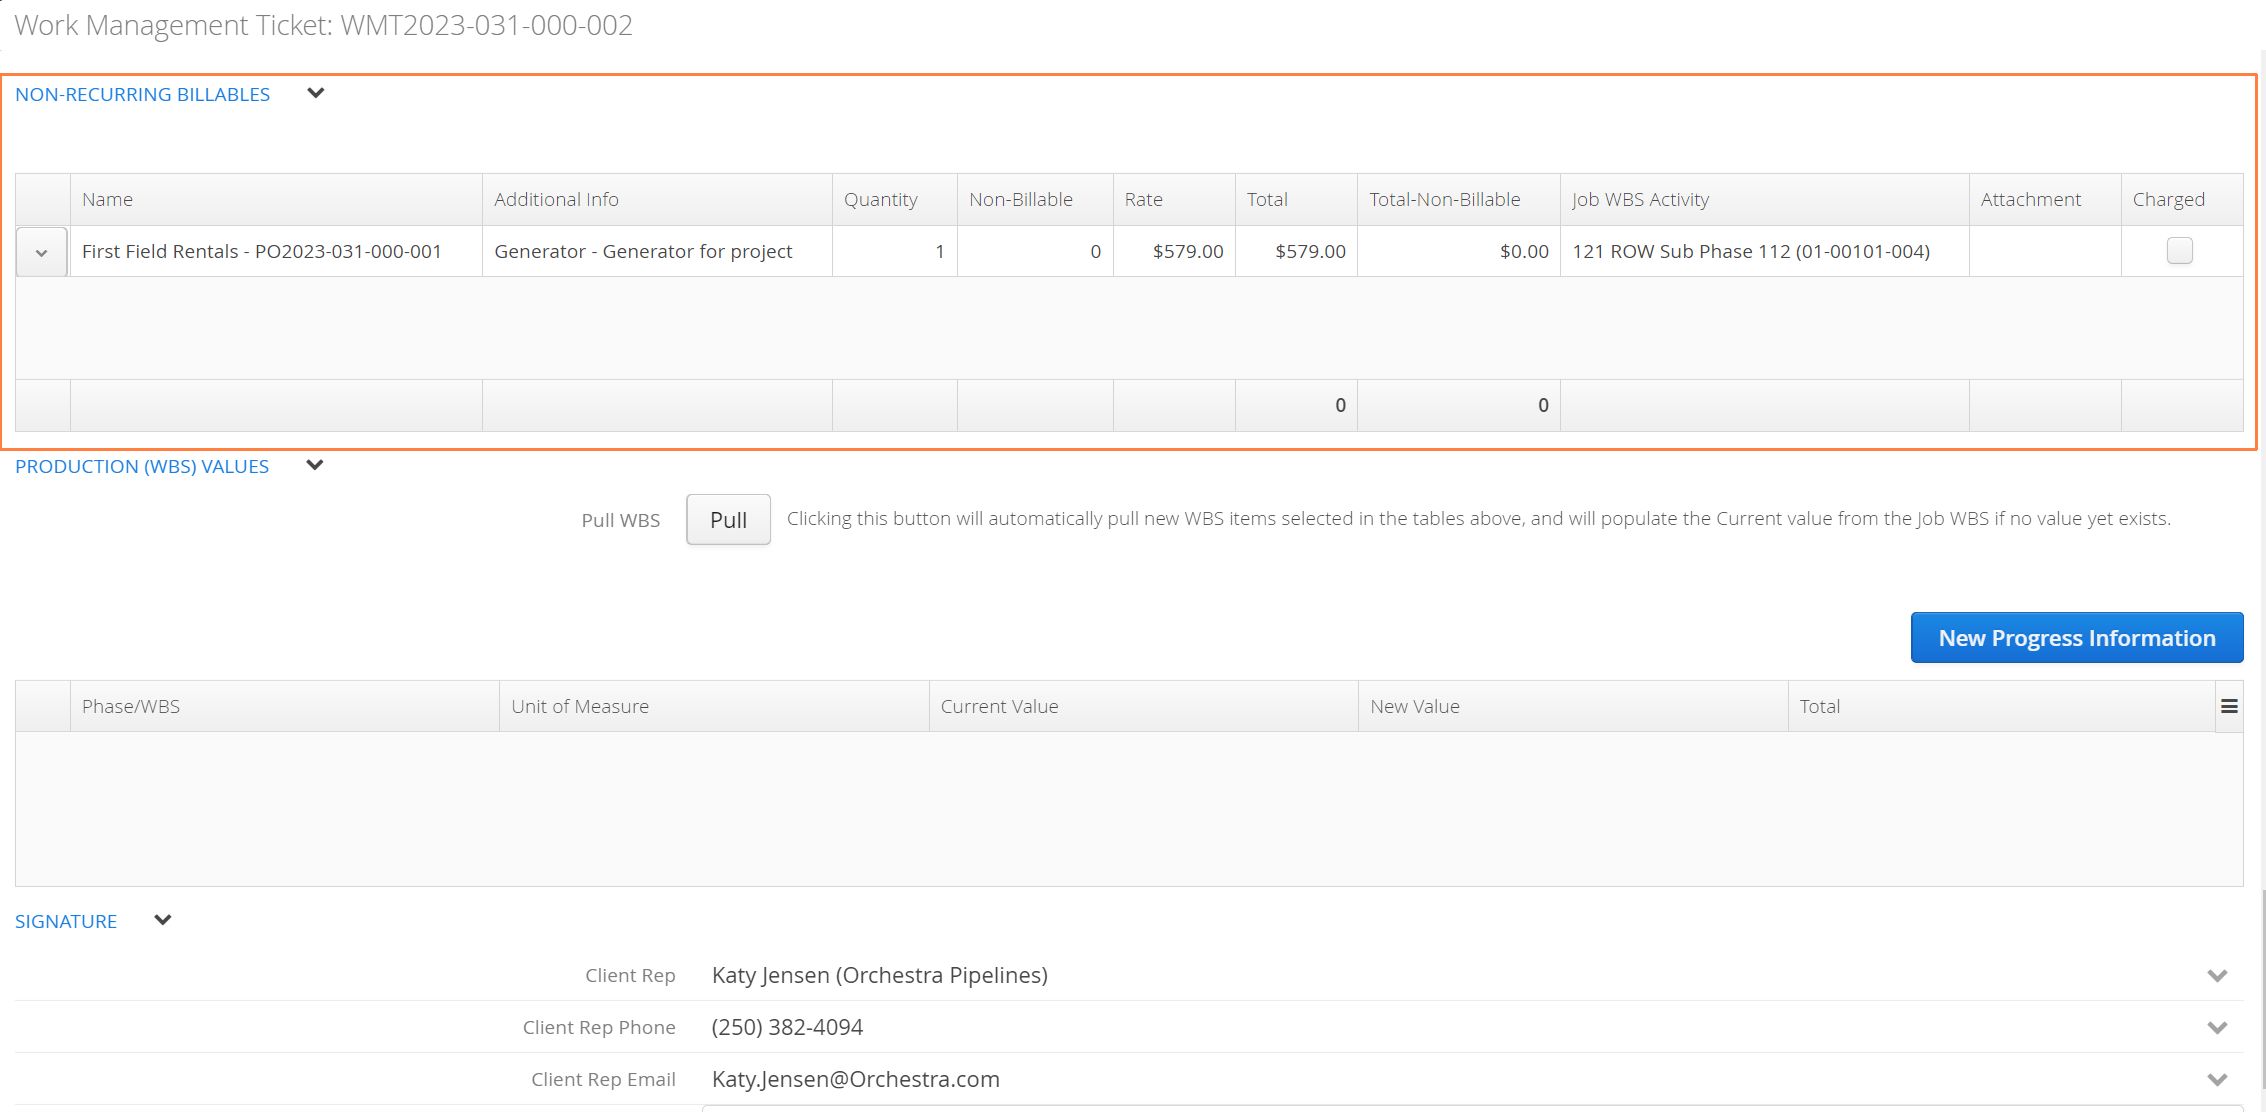
Any items that haven’t been billed back will automatically appear on this table with the received quantity. Click on the action button to the left of the item and select Charge.

A window will pop-up and allow a user to make any final edits before charging. If there is a WBS Schedule enabled, Non-Recurring Billables can be attributed to a specific Job WBS Activity.
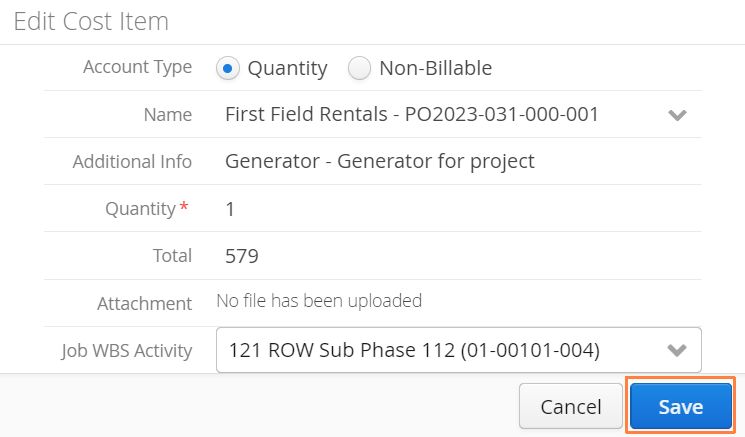
After clicking “Save”, users will see the item is now marked as “Charged” on the table. Charged items will be included on the PDF version of the Ticket. When an invoice is created, this charge will be listed as a line item too.

How to Edit a Purchase Order
Locate the Purchase Order from the Purchase Orders page. Use the action button to the left of the form and select Edit.
Editing a Purchase Order form after some or all the order has been received will require each NRB to be adjusted separately.
How to Edit or Delete NRBs
NRBs can be be edited or deleted via the Job → Non-Recurring Billables tab or by using the ‘View Non-Recurring Billables’ action beside a PO on the Purchase Order page.
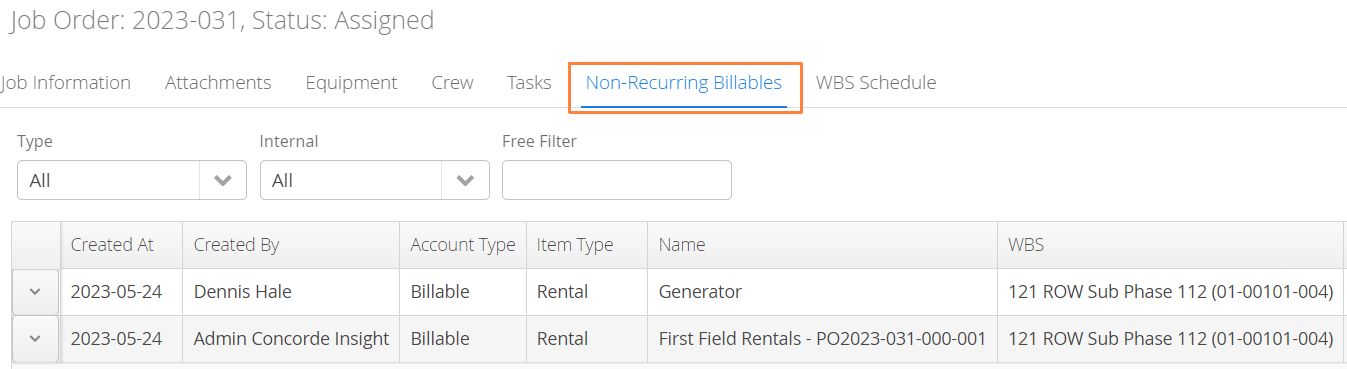
NRBs cannot be deleted after they have been charged. The charge would have to be removed from the Ticket form before being deleted. For more information on NRBs see: Non-Recurring Billable Items (NRBs)
Purchase Order Page Columns
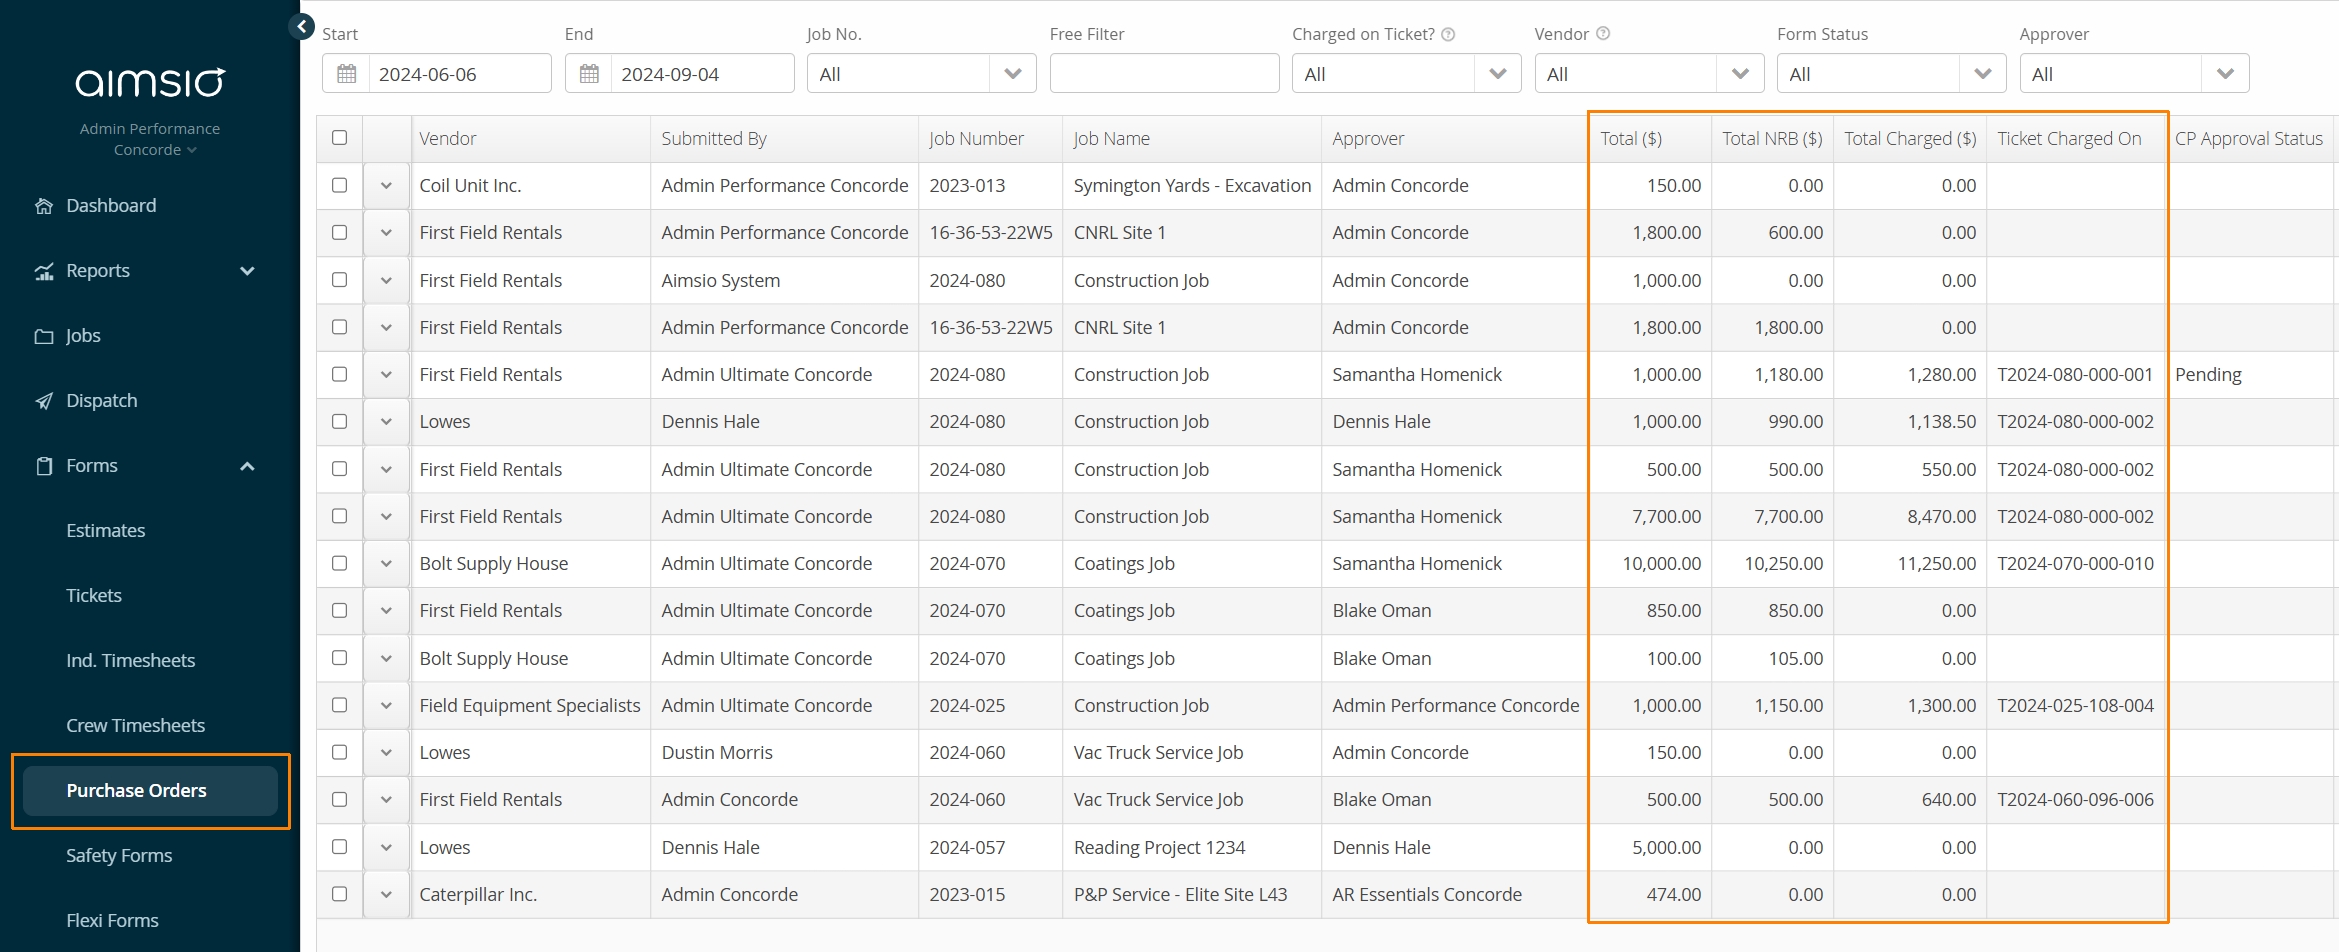
There are important metrics on your Purchase Order page to monitor:
-
Total ($): The total dollar amount of all items included on the original Purchase Order.
-
Total NRB ($): Accumulative total of all NRBs received against the PO. If there is a discrepancy between the PO Total ($) and Total NRB ($), it typically means the NRB Quantity or Rate were adjusted from the original PO amount when the items were received.
-
Total Charged ($): Total charged amount once a NRB has been charged to a ticket (w/ markup). This value will not populate until a NRB has been charged to a ticket, which is why you’ll always see the Field Ticket Charged On column populated beside the amount.